

Creating a simple invoice is essential for any business. It ensures you get paid and keeps your records organized.
Whether you’re a freelancer, small business owner, or just starting, knowing how to make an invoice is crucial. It’s not just about listing items and prices; it’s about clarity and professionalism. A well-crafted invoice can make a difference in how quickly you get paid and how your clients perceive your business.
Invoices serve as formal requests for payment. They provide a clear record of transactions. They detail what you sold, the price, and when payment is due. Crafting a simple invoice doesn’t require fancy software or skills. With a few basic elements, you can create an effective invoice. This guide will walk you through the process step-by-step, ensuring your invoices are both simple and professional. Let’s dive in and make invoicing a breeze for you.
Introduction to Simple Invoices
Creating a simple invoice can seem daunting at first, but it’s a straightforward process that every business owner should master. When I started freelancing, I realized how crucial it was to have a clear and professional invoice. It not only helped me get paid on time but also made my business look more credible. Let’s dive into the basics of simple invoices.
What Is an Invoice?
An invoice is a document you send to your client, detailing the services or products provided and the amount due. Think of it as a formal request for payment. It typically includes essential information like the date, your business details, the client’s details, a description of the services or products, and the total amount owed.
For example, if you run a graphic design business, your invoice might list the design work done, the hours spent, and the price per hour. This helps your client understand exactly what they are paying for. Including detailed descriptions prevents confusion and disputes.
Importance of Invoices
Invoices are not just about getting paid; they serve multiple purposes. Firstly, they help you keep track of your earnings. When you have a record of all invoices sent and paid, it’s easier to manage your finances and file taxes accurately.
Secondly, invoices reflect professionalism. A well-structured invoice shows that you take your business seriously. It builds trust with your clients, making them more likely to hire you again. Do you remember the last time you received a sloppy invoice? It probably didn’t leave a good impression.
Lastly, invoices can protect you legally. They serve as evidence of the agreement between you and your client. If a payment dispute arises, you have a clear document to refer to. This can be a lifesaver in tricky situations.
So, why not take a moment to create a simple, effective invoice template for your business? It’s a small step that can make a big difference.
Essential Components
Creating a simple invoice involves listing essential components like date, client details, and itemized services or products. Include payment terms and contact information for clarity. Clear formatting and simple language ensure understanding.
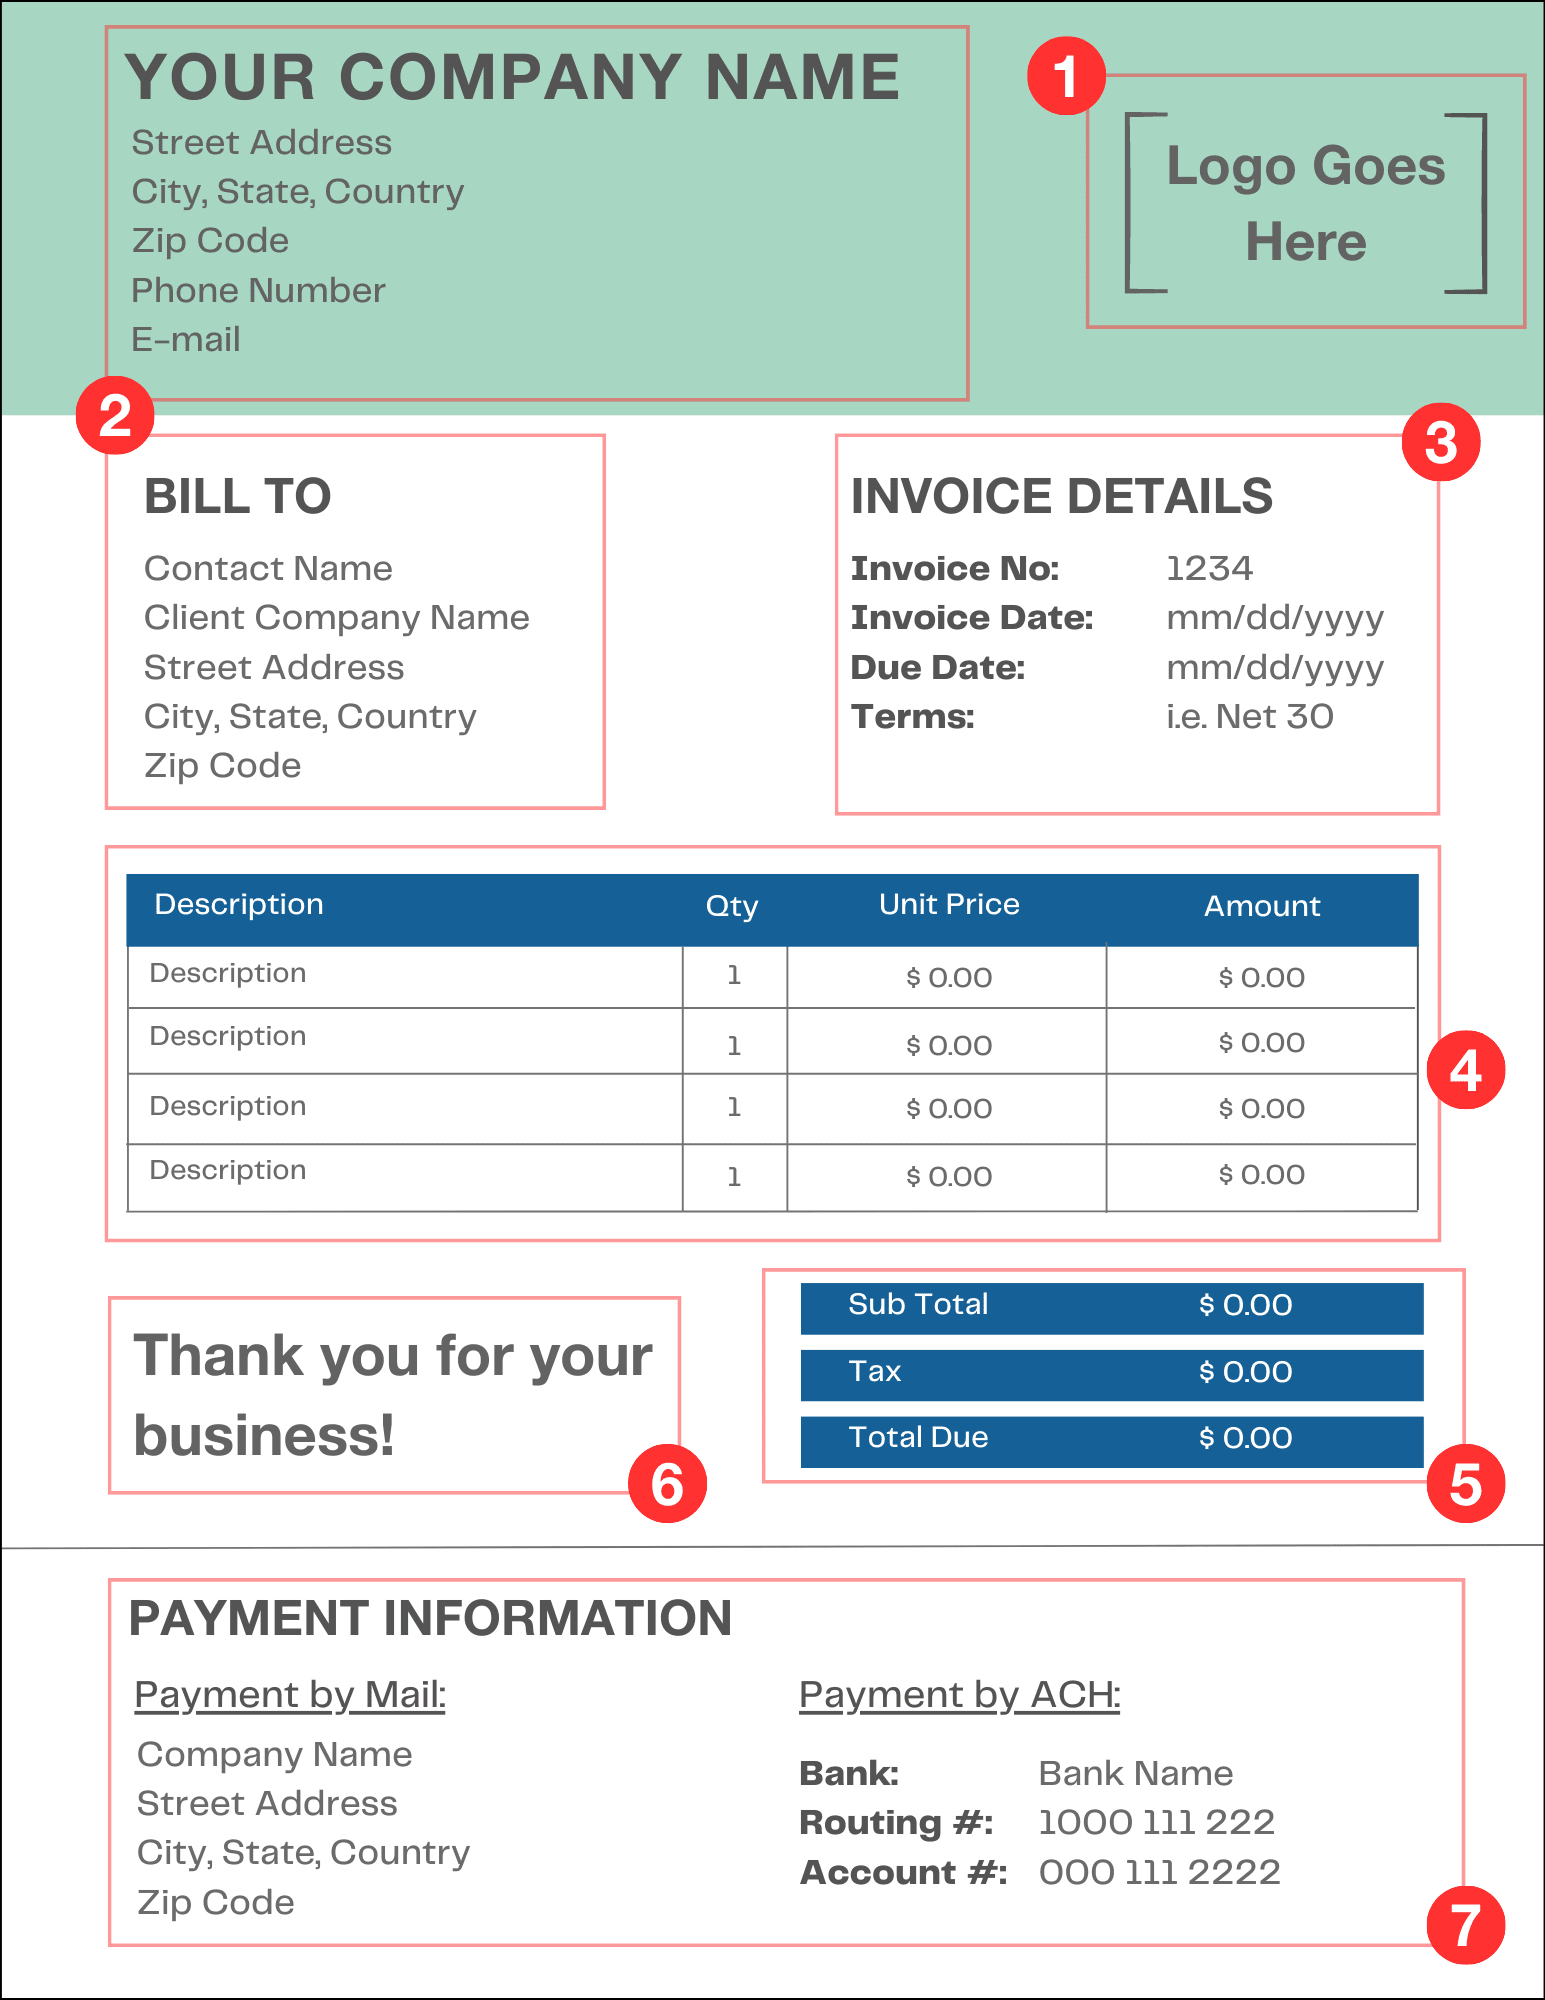
Creating a simple invoice doesn’t need to be a daunting task. It’s all about including the essential components. Whether you are a freelancer or a small business owner, knowing what to include in your invoice can make transactions smoother and more professional. But what are these must-have elements? Let’s dive into the key parts you shouldn’t overlook. ### \<h3\>Header Details\</h3\> Start your invoice with clear header details. This is the first thing your client will see. Include your business name, address, and contact information. If you have a logo, place it prominently to enhance brand recognition. These details not only make your invoice look professional but also ensure the client knows exactly who the invoice is from. Imagine receiving a bill with no clear indication of its origin—confusing, right? Avoid this by making your header informative and attractive. ### \<h3\>Client Information\</h3\> Next, focus on your client’s information. Clearly state the name of the person or company being billed. Include their address and contact details. This helps in ensuring the invoice reaches the right recipient and minimizes any confusion. Have you ever had a situation where payments were delayed simply because the invoice went to the wrong person? Adding precise client details can prevent such mishaps. It also shows your attention to detail and professionalism. Remember, a well-structured invoice is not just about getting paid. It’s about building trust and fostering long-term business relationships. Are you including all the essential components in your invoices? If not, now is the time to start!
Itemized List
Creating a simple invoice requires an itemized list. This list is crucial for clarity. It helps your clients understand charges. An itemized list improves transparency in transactions. It ensures both parties have a clear record. Let’s dive into the details of creating this list.
Description of Services
Start with a clear description of services. Use simple language for each item. Describe what you provided in straightforward terms. This section should be brief but detailed. Avoid technical jargon that clients might not understand. A clear description helps avoid confusion. It ensures clients know what they are paying for.
Quantity and Price
Next, specify the quantity and price. Indicate how many of each service you provided. State the cost per unit or service. This information is vital for transparency. It allows clients to see the breakdown of costs. Clearly list the total cost for each item. This helps in accurate calculations. Ensure all numbers are easy to read and understand.
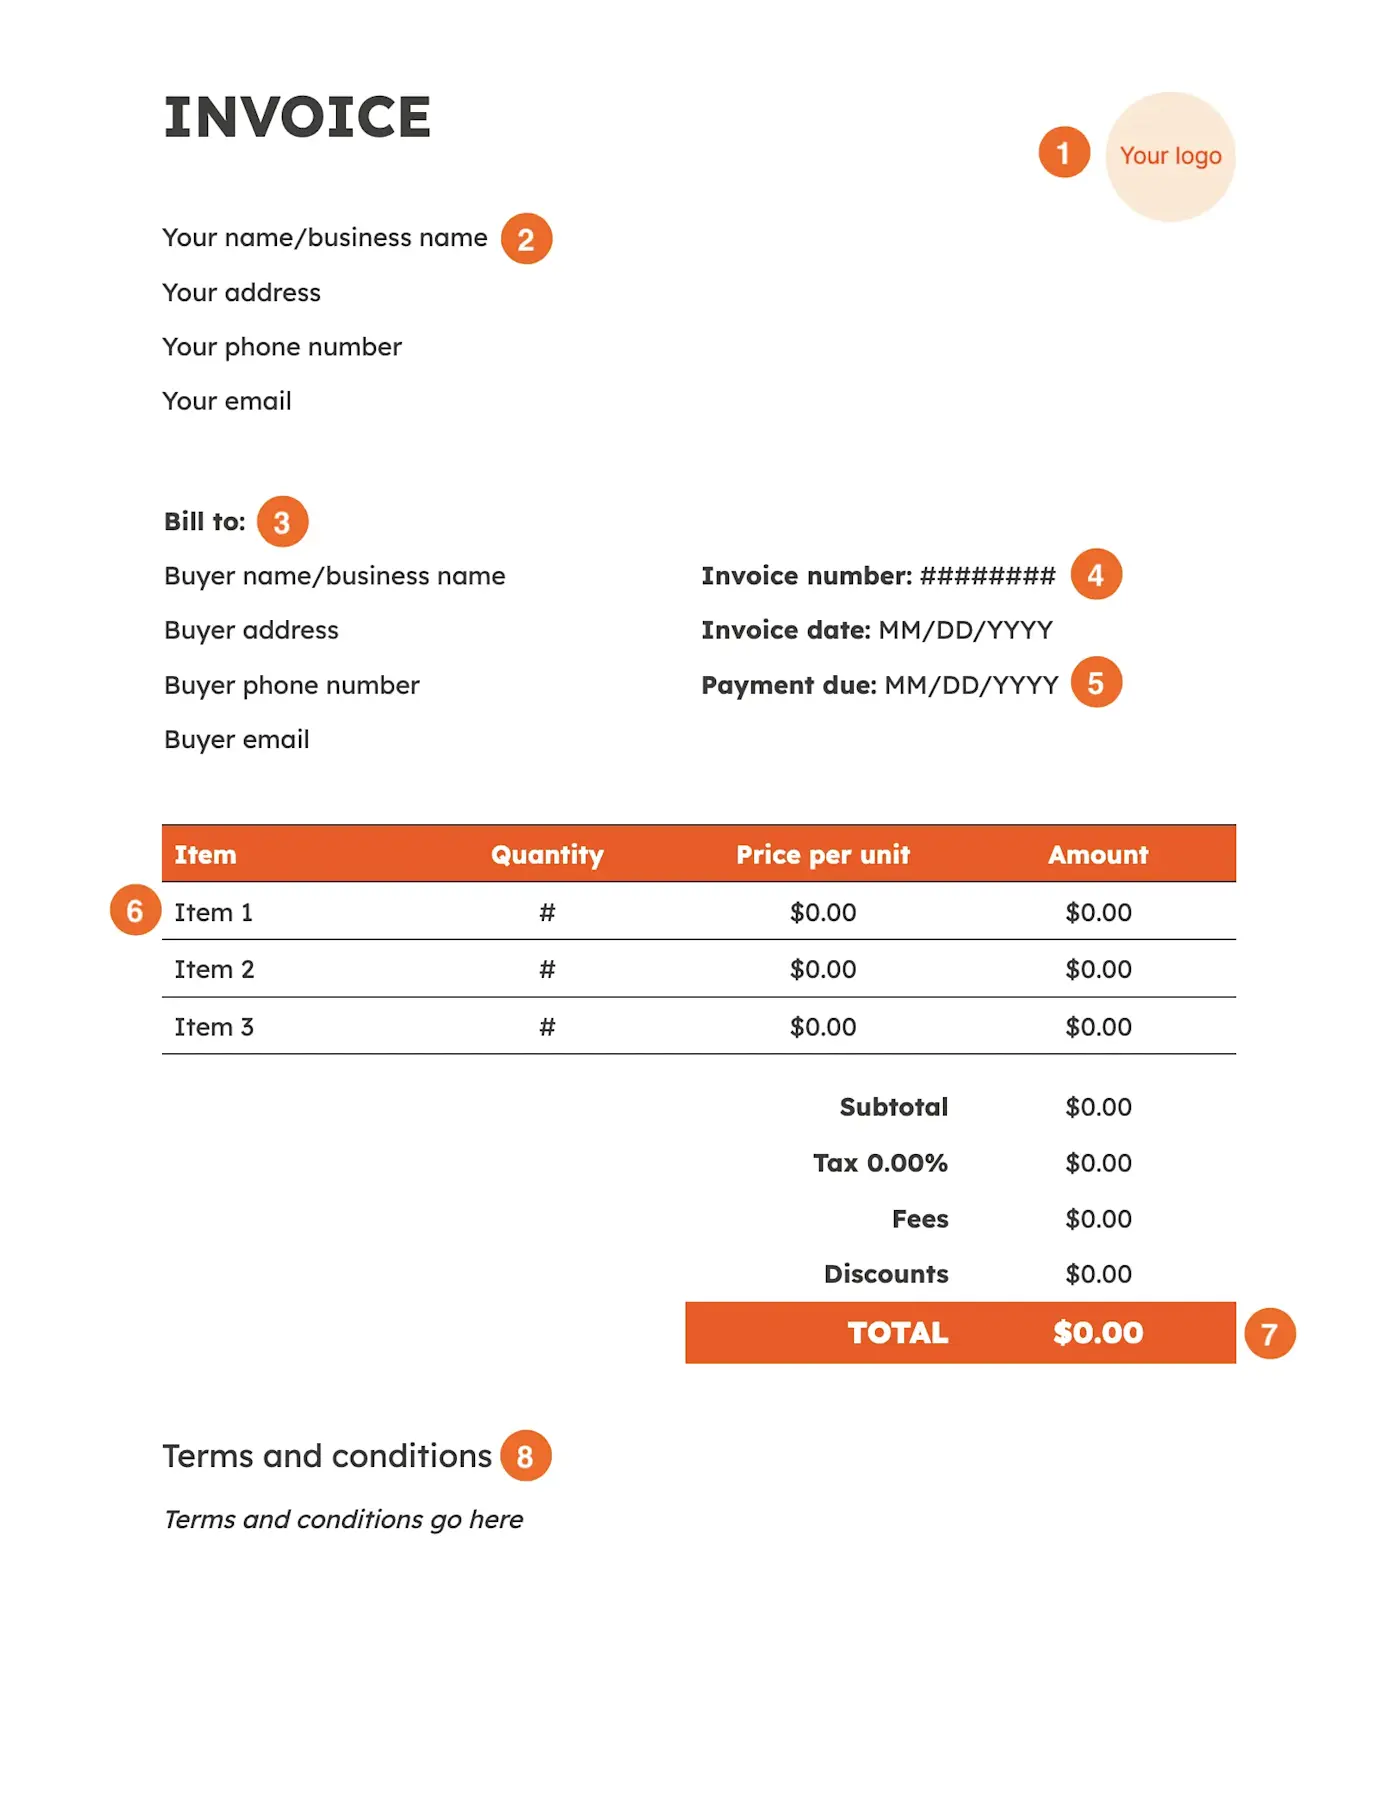
Credit: altline.sobanco.com
Calculating Totals
Creating an invoice may seem daunting, but calculating totals is a vital and straightforward step. This section will guide you through the process, ensuring your totals are accurate. Let’s dive into the details and make it simple for you.
Subtotal Calculation
The first step in calculating your totals is determining the subtotal. The subtotal represents the sum of all the items or services listed in your invoice before any taxes or discounts are applied.
To calculate the subtotal, list all the items or services you provided. For each item, multiply the unit price by the quantity. Add up all these amounts to get your subtotal.
For instance, if you sold 5 units of Product A at $10 each and 3 units of Product B at $15 each, your subtotal would be:
| Item | Quantity | Unit Price | Total |
|---|---|---|---|
| Product A | 5 | $10 | $50 |
| Product B | 3 | $15 | $45 |
Tax And Discounts
Next, you need to account for any taxes and discounts. This will adjust your subtotal to give you the final total amount.
Start with taxes. Determine the tax rate applicable to your products or services. Multiply your subtotal by the tax rate. Add this amount to your subtotal.
For example, if the tax rate is 10% and your subtotal is $95, the tax would be:
Subtotal with Tax: $95 + $9.50 = $104.50
Now, apply any discounts. Subtract the discount amount from the subtotal with tax. If you offered a $10 discount, the final total would be:
Do you see how simple it can be? Just follow these steps, and you’ll have accurate totals every time.
Always double-check your math to avoid errors. Your clients will appreciate the accuracy and professionalism.
Payment Terms
Understanding payment terms in invoicing is crucial. It sets expectations for both parties. Clear terms can prevent misunderstandings. They ensure timely payments and maintain healthy business relationships.
Due Date
The due date is vital in any invoice. It tells clients when payment is required. Typically, businesses use net terms like “Net 30” or “Net 60”. This means payment is due in 30 or 60 days. Specifying the exact date can reduce confusion. Always highlight this date on the invoice. Consider bold text or a different color.
Payment Methods
Offering various payment methods benefits both parties. Clients appreciate flexibility. Common options include bank transfer, credit card, and PayPal. Clearly list each method on the invoice. Provide necessary details like bank account numbers. For online payments, include links or instructions. Ensure all information is easy to find. Keep the process simple and straightforward.
Design and Layout
Crafting a simple invoice involves clear design and layout. Start with basic sections like company name, client details, and itemized services. Use a clean font and logical arrangement to ensure easy readability.
Creating an invoice might seem like a mundane task, but with the right design and layout, it can become a reflection of your professionalism and brand identity. A well-designed invoice not only helps in maintaining clear communication but also leaves a lasting impression on your clients. Let’s dive into how you can design a simple yet effective invoice by focusing on key elements such as choosing a template and incorporating branding elements. ###
Choosing a Template
Start by selecting a template that aligns with your business style. Whether you’re a creative freelancer or a corporate entity, there’s a template that suits your needs. Look for templates that are clean and easy to read. Simplicity is key. Avoid cluttered designs that could confuse your clients. Consider using online platforms that offer free and customizable templates. These platforms often provide templates tailored to specific industries, ensuring relevance and functionality. ###
Branding Elements
Your invoice is an extension of your brand. Think about how you can integrate branding elements effectively. Include your logo prominently at the top. This not only reinforces your brand identity but also makes the invoice instantly recognizable. Choose colors that match your brand palette. A consistent color scheme enhances your brand image and adds a professional touch. Incorporate fonts that reflect your brand’s voice. If your brand is playful, opt for casual fonts; if it’s more formal, stick to classic typefaces. Have you ever received an invoice that felt impersonal? Adding branding elements can transform the ordinary into something engaging. Your clients will appreciate the attention to detail and consistency. Consider how the design and layout of your invoice can impact client perception. Will they view you as organized and trustworthy or otherwise? The choice is yours.
Digital Tools
Create a simple invoice using digital tools. Choose an invoice template and fill in details like item names, prices, and customer information. Save and send the completed invoice to clients easily.
In today’s fast-paced world, creating a simple invoice is easier than ever, thanks to digital tools. These tools streamline the invoicing process, making it quick and efficient. Whether you’re a freelancer or a small business owner, leveraging digital tools can save you time and reduce errors.
Invoice Software
Invoice software is a game-changer for anyone who regularly sends invoices. It offers features like automated calculations, professional templates, and easy customization. You can generate invoices in minutes, not hours. Many software options also integrate with accounting tools, keeping your financial records organized. Imagine sending an invoice with just a few clicks and having it automatically logged in your books. But not all software is created equal. Consider your specific needs and budget when choosing the right one for your business. What works for a large company might be overkill for a freelancer.
Online Platforms
Online platforms provide a versatile solution for creating invoices without downloading software. Platforms like PayPal or FreshBooks offer user-friendly interfaces and are accessible from any device with an internet connection. These platforms often include features like payment tracking and reminders, ensuring you get paid on time. Why worry about missed payments when you can have automated reminders do the job for you? Additionally, online platforms often offer cloud storage, making it easy to access your invoices anytime, anywhere. This flexibility is crucial for those who are always on the move or work from multiple locations. What digital tool will you try next to make your invoicing process smoother and more efficient?
Credit: zapier.com
Sending the Invoice
Creating a simple invoice involves using clear headings, listing services or products, and including payment terms. Ensure each invoice has a unique number and your contact details. This helps clients easily understand and process their payments.
Creating an invoice is only half the battle. Once your invoice is ready, sending it promptly and efficiently is crucial to ensure timely payment. Imagine spending time crafting the perfect invoice and then losing track of it in a cluttered desk. You wouldn’t want that, right? Sending an invoice might seem like a simple task, but doing it right can make all the difference. Let’s dive into the essential steps of sending your invoice smoothly and effectively.
Emailing the Invoice
Emailing your invoice is often the quickest and most convenient method. Attach the invoice as a PDF to ensure it retains its format, regardless of the recipient’s device. A clear and concise subject line like “Invoice #12345 for [Your Business Name]” can help avoid confusion. In the email body, greet your client personally and briefly summarize the invoice details. Mention the total amount, due date, and any relevant terms. This ensures your client knows exactly what to expect without even opening the attachment. Don’t forget to ask for confirmation of receipt. A simple line, “Could you please confirm once you’ve received this?” can save you follow-up headaches later. ###
Tracking Payments
Once your invoice is sent, tracking payments becomes the next vital step. It’s easy to assume the payment will come in, but without tracking, you might miss overdue invoices. Use a spreadsheet or invoicing software to record sent invoices and monitor their payment status. Mark invoices as “paid” or “unpaid” and note the due dates. This can help you quickly identify any outstanding payments. Set reminders for yourself a few days before an invoice is due. A gentle reminder email to your client can sometimes speed up the process. It shows professionalism and ensures your cash flow remains uninterrupted. Have you ever found yourself waiting endlessly for a payment that never came? Tracking payments ensures you’re never left in the dark. By actively managing these steps, you’ll not only streamline your invoicing process but also strengthen your client relationships.
Credit: www.billdu.com
Frequently Asked Questions
How Do I Write a Simple Invoice?
To write a simple invoice, include your business name, contact information, invoice number, date, itemized list of services or products, prices, total amount due, and payment terms. Use clear headings and ensure all details are accurate. This helps in maintaining professionalism and clarity.
How Do I Create a Simple Invoice in Word?
Open Word and choose a blank document. Insert a table with necessary columns like date, description, and amount. Fill in your details, client information, and invoice items. Save and print the invoice.
Can I Create an Invoice Myself?
Yes, you can create an invoice yourself using online templates or accounting software. Ensure it includes essential details like date, client information, product or service description, and payment terms. Creating your own invoice helps maintain professional records and manage transactions efficiently.
Is an Invoice Simple Free?
Yes, Invoice Simple offers a free version. You can create, send, and manage invoices without any cost.
Conclusion
Creating a simple invoice doesn’t have to be difficult. Follow the steps outlined and you’ll craft professional invoices in no time. This helps keep your business organized and clients happy. Clear invoices reduce payment delays and confusion. Practicing this skill will benefit your business operations.
Start today and streamline your invoicing process. Remember, a well-made invoice reflects your professionalism. Happy invoicing!

